 |
 |
|
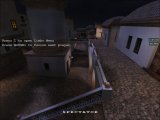
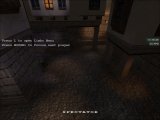
Allied Spawn #1 |
Main Entrance |
 |
 |
|
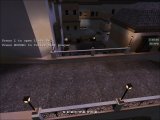
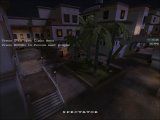
Town center |
Back route |
Goldrush
Strategies
Summary
Goldrush is a good map, and tends to be pretty balanced so no team has a definite advantage. I like it because I can get a pretty good FPS on this map. Also, there are lots of short alleyways and corners where you can hide and ambush enemies. It's a very good map for close-range fighting. (Sorry, snipers!) There's also plenty of spawncamping on the Allied Spawn #2 and Axis Spawn #2, and arty spamming can help a lot.
Map layout
In this section, we'll go through the names of all the locations on the map, so you know what we're talking about when we refer to them.
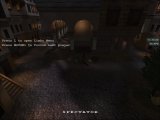
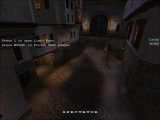
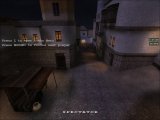
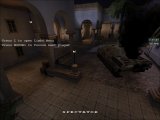
The Allies start out in "Allied spawn #1", and can attack from 3 routes. The main route (going through the main entrance), the side route (going through the hallway near the Axis command post), and the back route (by going up the big hill). There's also a large yard which has some health/ammo cabinets. I don't think this has a name so let's just call it the "town center" :)
|
|
|
|
Allied Spawn #1 |
Main Entrance |
|
|
|
|
Town center |
Back route |
After the Allies steal the tank, they get to spawn at the Tank Depot, a.k.a. Allied Spawn #2. From here they basically escort the tank down the big hill, over the bridge, and finally to the courtyard near the bank. While they are trying to move the tank, some Axis may be camping them from the balcony.
 |
 |
|
Tank Depot |
Balcony |
 |
 |
|
Bridge |
Axis Spawn #2 |
In the final stage of the map, the Allies will be entering the courtyard, and finally making their way to the bank to steal the gold.
 |
 |
|
Courtyard |
Bank |
Allies Strategy
Stage 1 - Steal the tank
Rush, and have plenty of engineers. If you want to take the tank, you have to rush it. There's no way you will kill every single Axis defender, so instead of focusing so much on killing, you need to think of it more as getting in there and creating chaos so that the engies can repair the tank before they get shot down. Don't be afraid to have a lot of engineers- I've seen teams where EVERYONE was an engineer, and we got the tank on our first try. A good rule of thumb might be, have 2/3 of your team be engies. If you have place for a covert ops, you can throw smoke. You could also experiment with other strategies like have a field ops run in ahead of everyone, throw an airstrike. As soon as it clears, everyone runs in.
A big part of your strategy will be where everyone should enter from. Rushing the main entrance is generally a good idea, because if you don't, you'll give the axis engies a chance to mine up the tank area, making it extremely difficult for the engineers. Keep that route exercised though, and you can keep the mines down (both by killing those engies, and by tripping over their mines!) You could also have 2-3 guys going thru the side entrance and distracting the Axis.
You can also try alternating routes. For example, every time you spawn, you can announce which route your team should attack this time. This works best in a clan of course, although if the people you're playing with are willing to go with your strat, you might be able to coordinate something like this.
When you get near the main entrance, prime up a nade so you can take out at least 1 guy before you die (hopefully)! If you're a medic with adrenaline, you could go thru the main entrance and trip some mines on purpose so your engies don't die on them.
Usually if your team is rushing like they should, you should have the tank within 2-5 minutes.
Note, it's very popular for 1 engy to go by himself to the Axis Spawn #2 and mine up the exits. This helps because it buys your team some time when you are trying to get the tank past Tank barrier #1. If you have a large team, this is probably a good idea. If you are in a tense clan match or something though, then stick to the main objective.
Stage 2 - Get the tank past tank barrier #1
I don't know why, but this part always seems to be really easy or really hard. It really helps if you can have some guys go up ahead of the tank, down to the bottom of the hill, and keep that area clear of Axis who are trying to come up the stairs. If you had a lot of engies in the last stage, some of them can switch to other classes like medic, fdops, or panzer. Don't bother with covert ops, there's not much need for them here. Still keep at least 2 engies, or 1/3 of your team, whichever is more.
If you managed to steal the tank very early on, then there's a good chance they never even constructed tank barrier #2.
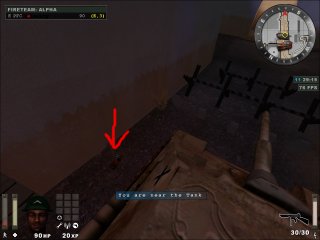
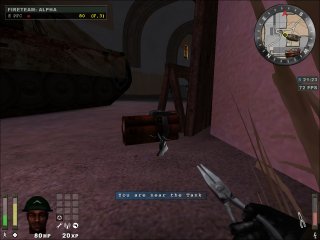
If it is constructed, try to place the dyno as far away from the tank barrier as you can. This way, Axis engies have to run right really far to defuse it. In the picture below, I planted the dyno to the left of the tank, and pretty far from the tank barrier. The dyno is a little hard to see, so I put a red arrow pointing to it... You don't have to worry about the dyno damaging the tank, because you can't damage your own team's tank! If you are lucky enough to place the dyno in this spot, then it's pretty easy to defend. You could use an MG, artillery on the other side, nade spamming, and good ol' trusty SMGs.
Notice, I put the dyno to the side of the tank, not in front of it! If you put it in front, you're only putting it in a place where Axis engies be able to use the tank as cover so you won't be able to kill him.
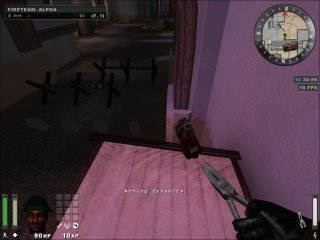
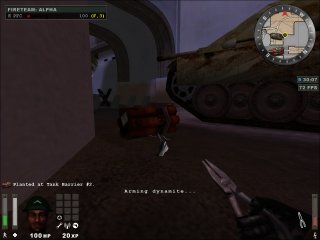
It's also pretty popular to place the dyno to the side of the tank barrier. This is a safe place to plant because you have a lot of cover here. However, it's also fairly easy for Axis engies to reach this spot. Here is a picture showing this spot:

You can even plant the dyno ON the tank itself while you're at the top of the big hill, and then just move the tank near the barrier to blow it up! I call this the "Trojan horse" tactic. It takes about 18-20 seconds to get the tank down the hill assuming that you don't get stopped on the way. This is always a fun trick to try although if the tank gets stopped then that's a waste of 1 good dyno.
Have plenty of guys take the side route to get to tank barrier #1 so they can avoid going down the big hill and get camped there. By going through this route, they can hopefully shake up the Axis defense a bit, and regain control of the balcony.
As with many things, the key on this part is to push early and push hard, before the Axis set up their defense. Once they have control of the area, it's going to be really hard because they'll be artying like crazy, and they'll have a huge height advantage.
Stage 3 - Get the tank past to barrier #2
On this part, it helps if you spawncamp a bit- get a field ops spamming the Axis spawn exit and possibly a panzer up on the bridge. Most of the Axis will be coming out of the main spawn exit (the one closest to tank barrier #2) so that's where you should concentrate most of your spawncamping.
Usually if your engies are good and the rest of the team is putting up a strong push against the Axis, you can get the tank to tank barrier #2 eventually, even if you get stuck once in a while along the way. Just make sure your medics escort the engies, and everyone else focuses on keeping the Axis away from the tank. Also watch out for enemy field ops or panzers who climb up on to the balcony and harrass you from there.
Once you get to the barrier #2, actually planting dyno it can be pretty difficult. It's right next to the Axis spawnpoint, so they can get reinforcements to it very easily, and call constant artillery. As always, keep enough medics around to escort your engies, and continue spawncamping the Axis.
If you're any engy, don't be a martyr. Don't just jump down and be shredded by Axis while you plant dyno. Approach this area very carefully, and don't go down there if there's 5 Axis guys roaming around near the tank. Even if you manage to plant, which is unlikely, they will quickly disarm the dyno. The best thing to do is, if you see some Axis running around on your side of the tank barrier, kill them first and then plant. You can try to kill them either from the top of the staircase, or from the bridge. If you have a medic who is escorting you, you could also try going the long way: i.e. go across the bridge, then down, and around to the tank barrier #2.
Remember to gib enemies on this part especially. There are often some very pesky Axis medics who will keep their teammates alive, so don't let this happen.
If you do manage to plant dyno though, it's usually easy to defend it since there are a lot of really good places you can plant it. Whatever you do, DON'T plant it right next to the barrier, because it's easy to defuse there. Ideally the perfect dyno spot would be somewhere that (a) you could plant it without being in the line of fire of the enemies and (b) it would be easy to hide somewhere and protect the dyno.
There are about 4 (!!!) places which are all pretty good for planting the dyno. Let's go through each of these.
Spot #1: On the edge of the stairs
The trick here is to plant it right on the very edge. If you can plant it here, there's a very good chance that you'll blow the barrier, because you can easily camp the dyno from above the stairs.
I give this plant a rating of 5/10. Although it is easy to camp there are some serious problems. First of all, what if you throw the dyno off the ledge by mistake, or not far enough? Also, you'll be right in all the Axis' line of fire. Finally, this position puts you far away from any medics on your team so essentially you're "all by yourself" if you try this.
Spot #2: On the white cloth thingy
I'm not sure what this cloth thing is called, but if you can jump down on to it, and plant dyno right at the edge of it, then you have a very good chance of getting past the barrier.
I give this plant a rating of 7/10. It's hard for enemy engies to defuse, but then again, it's hard to plant there! You're right in everyone's line of fire. Even if you go prone, this is a pretty risky spot.
Spot #3: To the right of the tank
As you can see, this is a pretty decent spot because you can hide behind the wall while you're planting it. Also, since it's behind all those wooden planks, the Axis might have a hard time seeing where it has been planted.
I give this plant a rating of 8/10. It's good because it gives you a bit of cover, BUT the main problem with it is that it's slightly hard to camp the dyno if it's in this spot. Most of the Allies usually tend to hang out to the left of the tank. But since the dyno is to the right of the tank, they won't have a line of fire to where the dyno is. If you plant it in this spot, the best place to camp it from is back near the mobile MG (but then your enemies will have a line of fire to you), or above the dyno, near the stairs. This may work- you can just perch above the dyno and keep spamming nades on it.
Spot #4: To the left of the tank
This spot gives you a fair amount of cover, yet it's in a place which is really easy to camp. The key to planting here is to plant the dyno as far away from the tank barrier as possible.
I give this plant a rating of 9/10. It's just about perfect- it's easy to plant and easy to camp. The only downside is that stupid teammates might get TK'ed in the dyno explosion since this spot is near where they might be hanging out.
Anyways, those 4 are the major spots where you can plant dyno, although don't forget you can also try the "Trojan horse" tactic, where you plant the dyno on the tank and then just keep moving the tank towards the barrier.
Once the tank barrier is gone, repair the tank ASAP and then just keep pushing it. Usually it's pretty easy to get the tank to blow up the bank doors once it's past Tank barrier #2.
Stage 4 - Get the gold!
Hopefully if you were successful in the earlier stages you will have at least 10 minutes left in the game. Ideally 15-20. You need to leave at least 3-4 minutes for moving the truck (and that's assuming you are able to move the truck without any major hitches), so keep that in mind.
This part requires a lot of teamwork, whereas for the most part, the other stages were easy if you just had 2 or 3 really good engineers. You should have a couple of people spawncamping the Axis to cut off reinforcements to the bank, while everyone else rushes. Try to also get in an early rush as soon as the tank blows the bank doors, because then you can get in the bank before the Axis do. One really fun thing to do is set up your own defense in the bank as soon as the doors blow! You could go mobile MG, and then camp the gold so that no Axis can get in to defend their own gold, while meanwhile you allow your teammates to run in and steal it.
For spawncamping, artillery and panzers are probably the best. Camp the route which goes from the Axis spawn, to behind the bank. You can even call artillery on that route (in the little area with the crates directly outside the Axis spawn). Another fun thing to do is mortar that room. Or, you could set up your mortar right seconds before the enemies spawn and then fire a shot at 90 degrees. Just stay there and then when all the Axis spawn, instead of running out like they should, they'll all freak out and try to kill you before you mortar them. But, 3 seconds later their invulnerability will wear off and your mortar you fired will come back down and kill them! This is pretty funny and probably won't work against good players, but on pubs I've seen it take out 1/3 to 1/2 of the Axis at once!
The people who are rushing the bank should divide themselves among the 2 spawnpoints. People at the tank depot can enter the courtyard from the bridge, while the others attack from the town center.
You have 3 main routes to choose from. You can go through the Axis spawnpoint itself and then sneak in behind the bank, you can go straight down the stairs and go through the main entrance, or you can go in from the right side of the courtyard and sneak up behind the bank from that side. For the most part, I think you just have to be observant and see which route is easiest. Usually the spawnpoint route is pretty easy, but if the Axis get smart and start setting up a defense on their own spawnpoint to prevent you from coming in, then this can get tough.
One cool thing you can do is use a bunny hop to get across the courtyard very quickly. If you don't know about bunny hopping, then read the trickjumping section. Here is a demo showing me bunny hopping. The key is to use the sloped surface next to the stairs to jump on first to build up speed, then to land somewhere on the grassy area to get in your next bunny hop, which will take you all the way across the grassy area. From there, you can either go up the stairs and to the bank from the front, or behind the bank (in this demo, I go behind the bank):
Download goldrush_courtyard.dm_83
Once you get near the bank, the biggest problem will be any mobile MG's. Just be smart about it, don't run in there and try to kill the MG with your Thompson. There are a few good ways to neutralize the MG's:
Prime nades and "spray and pray" before you rush some area. Use your compass map to make sure you don't "spray" your own teammates. But, in general, nades can be very useful on this part, especially in the bank itself.
This is the stage where most teams get stuck. Just be persistent, and use explosives and medics effectively. Focus on rushing, don't hang back and snipe or repair the tank, etc. Everyone needs to focus on the gold. Don't repair the tank, because then the Axis can use it against you. Watch out for mines near the truck. If you get to the bank, use team chat to inform everyone about what's in the bank. For example, "1 medic, 1 MG on the left side". If you see someone running with the gold, run near them and give them covering fire. Stay close, so if they die, you can pick up the gold and complete the run.
Stage 5 - Escape with the truck
This tends to be the easiest stage most of the time. It takes about 50 seconds to move the truck to the end of the map, IF there are no hitches. You may want to blow truck barrier #2 ahead of time, so that when you DO have the gold, you can get away with it very quickly. You could also blow TB #1, although this one is slightly easier for Axis engies to come and construct.
Make sure you have enough engies, especially if some of the engies switched classes during stage 4. If truck barrier #1 isn't already blown, dyno it while the other engies work on getting the tank moving. Spawncamp the Axis like crazy: most of your team should be pushing the Axis back and keeping them contained to the courtyard, while meanwhile 2-3 engies+medics can stay close to the truck and keep it moving.
Now, the roles are kind of reversed. You're really playing defense now, because you have to defend against the Axis who are coming and trying to stop the truck. So, remember defense always has the advantage: you can set up some defensive measures in the town center, such as MG's and possibly landmines. Another thing you can use to your advantage is the fact that almost all the Axis will be chasing you from a single route (the passageway between the Axis Spawn and the town center).
Axis Strategy
Stage 1 - Prevent the tank from being stolen
This is very tough to do if the Allies are any good. Have 1 or 2 engies mine up the tank area, build the command post, and then build tank barrier #1, in that order. Do not put mines right in the way of the main entrance, since this prevents your teammates from leaving the tank depot if they want to go attack the Allies.
Remember, you are playing DEFENSE! So you want to have an outer defense and an inner defense. Outer D is important: without it, Allies will come in huge rushes, and enemy field ops can run in and airstrike you which really is disrupting. Inner D is also important: if everyone runs out to fight the enemy, that leaves the tank wide open to any engy who sneaks through.
Inner D
First of all, you should have a couple of medics- they can throw med packs in little "piles" and teammates should know they can just run over the pile when they are low on health. The meds should also be ready with their SMGs in case someone comes in.
One or two engies (depending on the size of your team) should work on getting landmines up near the tank. Don't place landmines in the doorway of the main entrance, because this will make it difficult for your teammates who are playing outer D to exit.
Spread out so you can get good coverage and crossfire. Don't stay too close to the tank: if the enemy trips landmines coming in, then the landmine will also kill you. This can get really messy! Also don't stay right in the middle of the tank depot area where you'll be an easy target for anyone coming in, and airstrikes as well. Try not to wander out too far- keeping enemies out of the tank area is outer D's job. You want to be somewhere in the main tank depot yard so that you have a line of fire to engies coming in.
Try to keep everyone in your inner D in good condition. If you are low on health and/or ammo and the respawn timer is near 1, just /kill yourself so you can come back fresh.
Watch out for airstrikes. If you are close enough to it, and it was thrown by a low level field ops, cancel it by going prone on the cannister and then getting off of it before the small explosion occurs.
One or two MG's is a very good idea, depending on the size of your team. This works well on defending any of the 3 routes: back route, side route, or main route, especially since the Allies are generally coming in through narrow choke points.
You could TRY using a flamethrower, but I usually avoid it because first of all, rifle nades and regular nades can often take you out effectively. But also, you often block your outer D from doing their job, which can be really annoying to them. You might think that your teammates are smart enough not to try to go somewhere when you're flaming that area but they're often impatient and will try to just go past your flames anyways, e.g. for throwing an airstrike outside the main entrance. Also, flaming may delay allies from rushing, which causes them to clump up and then the moment a rifle nade kills you, they all rush in together and overwhelm your defenses. Just to test my theory that flamers are evil on this part, I just went and tried being a flamer on a pub, and the result was horrible as I expected. I kept getting rifle naded, and my teammates kept running into my flames. Then, as soon as I died, suddenly a bunch of engies who had been waiting for me to die, would rush the tank together and my teammates had a hard time dealing with such a big rush.
If you must use a flamethrower, you could try going on outer D and camping the little hallway (the side exit from the Allied Spawn #1 which leads to the side entrance to the tank depot). However, I still think it's a bad weapon to use since it's so easy for a good rifle nade to take you out.
Outer D
Maybe 1/3 to 1/2 of your team can be outer defense, definitely no more than that. Also if your team is small, like 7 people, then only a couple of people should be on outer D. The people who go out to fight can be field ops (artillery), panzer, or rambo medic. If you have enough people on your team to spare a medic, that can also help so he can work together with a field ops or panzer to watch their back and heal/revive them.
There are many strategies you can follow for outer D. For example, you could have everyone primarily camp the route to the main entrance. This is nice because then you can use the Allies' own health and ammo packs for yourself, and also the main entrance tends to be the easiest one for allies, so keeping this one from being invaded really helps. Also, by keeping them away from the main, you may be able to force them to rush the side entrance, which makes it easy for your inner D to catch them because they'll all be coming through a small doorway which you can easily aim an MG on.
You should also try to watch the back route so Allies don't come up on you and take you by surprise. If Allies manage to come in through the back, this is outer D's fault. To defend the back route, you could have a panzer who stays up near the balcony and surprises any Allies running towards the big hill, or going to blow tank barrier #1. You could even have a field ops, although I think it's usually best to concentrate artillery near the main entrance to the tank depot.
Stage 2 - Don't let the tank get past barrier #1
Once the Allies have the tank, they will all spawn at the tank depot and slaughter whatever remaining Axis are left. So, if you are still alive when the tank is stolen, feel free to try to hamper the Allies, but make sure you /kill before respawn time. There's no point sticking around past that, because you'll get slaughtered anyways.
Good field ops and panzers are very important on this part. Keep constant artillery and airstrikes on the tank. (Remember: artillery for a tank that's not moving, airstrike for a tank that is). Everyone on the team should help to disable the tank using nades and whatever else they got up their sleeves. Most importantly though, keep the area near truck barrier #1 clear of any Allied engineers!
Take control of the balcony, so your field ops and panzers can have a height advantage. Support them well with a medic or two. Keep heavy fire with your SMGs, don't hesitate to fire even if the Allies are all the way on the other side of the big hill.
Watch out for enemy panzers who can shoot you from the other side of the big hill, so try to stay moving every once in a while so you don't present an easy target.
This part tends to be the hardest for Axis, because you get sent back all the way to the second spawn point, so don't worry if the tank gets past tank barrier #1, it's usually not a big deal.
Stage 3 - Don't let the tank get past barrier #2
Be very persistent in stopping the tank at every point. To do this, don't just disable the tank from a distance, you have to get up there and take control of the area around the tank so that once it is disabled, engies can't just run in and repair it again.
It's usually fairly easy to camp the tank area if the tank is on the bridge. First of all, take control of the balcony, and use that to take out groups of enemies (artillery+panzers+medic to support them). Around the tank itself, you can have more guys defending, including 1 or 2 mobile MG's. Don't try to use the tank MG: as good of a weapon as it is, you don't want to give them a fighting chance to move that tank!
Some people like to plant a cluster of mines in the tank's path, so that as soon as it starts moving, it will get disabled again. In my opinion, this is a bad idea, because even if you disable the tank, the engy will still be there to just repair it again. So, if you want to plant mines, plant them in front of the tank so that engies can't get there in the first place. Be careful though, mines are messy and if you go overboard, you can hinder your own team as much as theirs!
Once the tank gets down to the tank barrier, that's your last chance to stop the Allies, so fight them with everything they got. Take control of the yard where the tank is parked, so that engies who come down to plant dyno get slaughtered. These guys are essentially your inner D. For your outer D, you should keep control of the balcony and the bridge. I'd probably concentrate artillery on outer D. If the Allies have control of the tank area, then you can call an airstrike there, but ideally Axis should be camping that area, so calling airstrikes would be counterproductive 'cause you'll just TK your own guys who are down near the tank.
If they plant dyno, and the Allies have a strong control over the area, then it's unlikely your engies will be able to defuse the dyno. So what you should do is, disable the tank about 5 seconds before the dyno blows. Throw everything you got at it- airstrikes, nades, the works. If you can disable the tank while the barrier is down, then you can quickly re-construct the barrier. That way, by the time the tank is fixed again, the barrier will be up. Make sure you have enough engineers! 3 or more guys, or about 1/3 to 1/4 of your team should be engies, whichever is bigger.
Stage 4 - Defend the bank
As soon as the tank gets past tank barrier #2, everyone should fall back to the bank. Why? Because if you stay out in the courtyard and a lot of your team gets killed, the Allies might start an early rush and try to get the gold before you have your defense set up.
Plant some mines near the truck, so any Allies trying to come from that side get killed. You could also plant mines right behind the truck so that anyone who is about to secure gold will get blown. However, from what I've seen, usually the mine doesn't activate until a certain radius, so even if the mine kills the guy securing the gold, it will kill him AFTER the gold is secured. (I hope that makes sense!) So, be intelligent about where you put your mines, and be VERY careful not to harm your own teammates. For example, you could plant mines around the stairs and grassy areas, but if you're on a pub where people won't be familiar with your mine placement, this is a bad idea.
The Allies will be coming from all directions, and probably spawning at both spawnpoints, so be ready. If your team is pwning them, don't get overconfident. For example, sometimes I see the Axis team camping the Tank depot and completely obliterating the Allies there. Then suddenly all the Allies switch to the other spawnpoint and steal the Gold before the Axis have time to realize what just happened. So, set up your outer D intelligently, in a way that you can effectively push them back as far as possible, yet remaining flexible in case they switch spawn points.
As always, you should have an inner D and outer D.
Inner D
The standard fare is to defend the bank with 1 or 2 medics + 1 or 2 MGs. From what I've seen, this seems to work pretty well. The only problem is that the MG's are very susceptible to explosives. If the Allies are well-coordinated, they may have little trouble taking out your MG's. (That's why you need medics so badly!) On the other hand, on a pub where most people aren't terribly skilled, MG's can prevent 90% of the people trying to come in. Thus, keep this in mind and consider moving around the placement of your MG's to stay unpredictable. For example, instead of just defending the bank itself, the MG is also good when placed somewhere behind the truck, for camping Allies coming in from the side. An MG could also be used to camp the route behind the bank, for Allies trying to sneak in from your own spawn point.
Anyways, this is a bit of a controversy. Some people think it's important to keep people centered in the bank, while others feel it's better to move your inner D out to the courtyard, simply because the bank itself is such a small area that it's easy for rifle nades or panzers to wreak havoc on you. However, leaving the bank completely empty is usually a bad idea. At the very least, keep a medic there, since medics are sturdy, versatile fighters who can beat most enemies except panzers and sometimes rifle nades.
Don't use a flamer in the bank... They're just very messy and annoy everyone.
In general, medics are extremely important to winning in this stage. The easiest way to lose this map is to have all your medics die. Then it's only a matter of time before everyone gets wiped out and the Allies run in and get the gold with no opposition. So be careful if you're a medic, don't make big runs across the courtyard if you can avoid it, since a panzer might camp you from the bridge. You have to stay alive so you can keep your buddies alive.
Besides defending the bank, it might be wise to also defend your own spawn point. The spawn is a popular route for getting to the bank, so you can almost always bet on some allies trying to come through there. If you leave this route open to them, it's a big advantage to them, because firstly, they can get behind your lines and sneak up on you. Secondly, field ops or panzers coming through this route can hide on the route to the bank and spawncamp you.
If you're playing inner D, but you're not in the bank itself, try to avoid being out in the middle of the courtyard. Even if you're defending the courtyard, you can try to do so from behind a corner or some place where you have some amount of cover. If you go out, then you'll just be easy picking for a panzer up on the bridge. You may also get caught in all the crazy arty spamming that's going on in this stage.
Outer D
A good outer D is very important, because if everyone stays back, or clusters in the bank, the Allies will just keep pounding you with huge rushes. You need ot wear down their numbers by the time they get to the bank. However, be careful your outer D isn't too heavy or too aggressive! For example, you could spawncamp the Allies at the tank depot, but if your whole team starts doing that, then what do you do when you realize their whole team has switched to the other spawn point?
Camp the balcony with artillery and panzers, possibly an MG set up somewhere. The town center can be camped by rambo medics, field ops, or engies. Make sure they don't set up a mobile MG in the town center overlooking your main spawn entrance.
Stage 5 - Stop the truck!
If there's more than 5 minutes left and you're at this stage, you're basically screwed. Eventually, the Allies WILL escape with the truck. It's just a matter of time, and your job is to delay them so that time runs out before they have a chance to escape.
Right after the truck is stolen, the Allies will most likely be spawncamping you, so be careful as you get out of the spawn point. Don't cluster. Also don't go out the main spawn exit if you can avoid it, it's likely to be either mined, or camped very badly.
Try to avoid having everyone all take the same route. The obvious route is to go straight out the main spawn exit, and then chase after the truck by running to the town center. However, this way you'll just be running straight into the Allies' trap. Remember, in this stage, roles are reversed. In a way, you are playing offense, while the Allies are playing defense. Just like any team playing defense, the Allies have the advantage because they know where you're coming from and they're preparing for you to come after the truck. And just like the Allies had to vary their routes they took when they came to get the gold, you have to as well.
So, the main route to the town center is just to go the same route as the truck's escape route. The other route you can take is to go up the stairs near the bridge, go to the end of the hallway under the balcony, and then emerge at the town center. Some Allies may try to set up a mobile MG to defend the main route, so this is why the side route is particularly useful- then you can sneak up and flank those MG's.
Throw airstrikes on the truck if it's moving. In general, good gunners will be important on this part. As great as soldiers are for fragging, they are very slow; you want your team to be able to move quickly because they'll be chasing after the truck. Rambo medics with adrenaline can be very helpful since they are the fastest.
Don't try to construct the truck barriers. If they haven't been constructed at this point, it's very likely that you'll live long enough to construct them. Focus on a strong offense of mostly medics and field ops. Try to take control of the town center, and call plenty of artillery.
Remember, as the truck gets further and further, it's going to take longer to get reinforcements to it. So, even having the truck moving for 10 seconds can seriously damage your team's hopes of winning. The truck only has to be moving for 50 seconds for it to get to the end of its escape route. This is why you want to keep the truck damaged during stage 4. It might not seem important at the time, but when the Allies load the gold on the truck, you want that truck to be damaged, otherwise the Allies will be able to get a head start on you before you respawn.
As I said, if you're at this point, you're probably going to lose if there's enough time left. But be very aggressive and don't give up- I've seen Axis hold the truck for 10-15 minutes before, so don't give up til it's over!!