Tips for each weapon
This section is about each type of weapon and how to
use it. Also, if you haven't read the "basic skills" section, I suggest you read
that first since it has some additional information on SMGs.
Knife

Normal stab: 10 HP
Backstab: 101 HP
Just go up to an enemy who is standing still, crouched, or prone, and stab them
in their upper back. Most of the time, it's an instant kill. If you're a covert
ops, it can be useful since you won't lose your uni when you stab from behind.
One interesting use of the knife is for disabling
crew-served MGs (just knife the MG a ton of times, 2 nades have the same
effect).
NOTE: If you are a covert ops, then a normal stab
does 20 HP of damage instead of 10. Also, if you have covert ops level 4 skills,
then a backstab is instant death.
MP40/Thompson


Bodyshot: 18 HP
Headshot with helmet: 40 HP
Headshot without helmet: 50 HP
Reload time: 2.5 seconds
6 rounds per second
30 rounds per clip
5 spare clips maximum
This is a great general-purpose weapon. Pretty good rate of fire, good clip size
(30 rounds), and MP40's and Thompsons are very common so you can often acquire
extra ammo by stealing people's guns after they're gibbed. Don't be afraid to
fire at targets who are a bit far away. Be persistent, often enemies are closer
to death than you think. Especially if they turn their back on you during the
fight- then you know they're in trouble!
Note, the MP40 and Thompson are EXACTLY THE
SAME. In RtCW, they weren't, but in ET they are (assuming you aren't playing
SephMod or something where the damage and firing rates are tweaked).
Level 3 light weapons is very useful because it
will reduce your spread. Note that in the original version of ET (etmain) there
was a bug that you wouldn't actually get your spread reduced until level 4, but
that has been fixed in the newer mods like etpro and shrub.
Also, on certain shrub servers, level 3 covert
ops ("breath control") will also reduce your spread according to Pete
"InThrees". One example of such a server is Goat's Bar & Grill.
See the basic skills section for tips on how to
use it.
Luger/Colt


Bodyshot: 18 HP
Headshot with helmet:40 HP
Headshot without helmet: 50 HP
Single pistols:
Reload time: ~1.5 seconds
3.5 rounds per second (if you click fast!)
8 rounds per clip
24 rounds total
Dual-wield (akimbo) pistols:
Reload time: ~2.5 seconds
7-10 rounds per second (if you click as fast as you can)
16 rounds per second (if you use a script)
16 rounds per clip
48 rounds total
As you can see, the damage done by pistols is same
as MP40/Thompson. But, obviously they are worse because of less rounds per clip,
slower rate of fire, and recoil. So only use them once you're out of SMG ammo.
Aim for the head, and try to make each shot count.
Don't underestimate pistols- if you run out of SMG
ammo, it's often a better idea to switch to pistols and keep firing right away
than to reload your SMG. Reloading simply takes too long if you're in the middle
of a fight.
Akimbo pistols amazingly lethal, especially if you use a script
to automatically make them fire as fast as possible. See the section on
"tweaking" section for the code for this script. 16 rounds per second is
just slightly slower than an MG42. You have to use it carefully though,
because it only takes 1 second to use up your whole clip. So, don't use your akimbos to fire at targets that are far
away or moving quickly. The best use is at point-blank range, in a place where
the enemy's movement is somewhat confined, like a narrow hallway. So keep in
mind, the script is useful in only certain places. If your enemy is moving
quickly, then you should just fire manually because otherwise you'll expend your
clip in 1 second and then you're screwed.
Sten

Bodyshot: 14 HP
Headshot with helmet: 40 HP
Headshot without helmet: 50 HP
Reload time: 3 second
After 16 rounds, it overheats for 2 seconds
32 rounds per clip
64 rounds total
The sten is slightly weaker than the other SMGs, and
it overheats after 16 rounds so try to fire in bursts if you can. Also, the
sound effect is very quiet so it can be a bit disorienting when you use it- it
feels like you aren't even hitting the enemy- but be persistent because you
really are! If you are good with headshots, the Sten is a great choice because
of it's great accuracy- you can shoot people who are at medium range (i.e. not
very close to you) and still score headshots.
The fact that the Sten is silenced makes it a great
choice because then you don't lose your uni when you kill people. Sometimes
people you're shooting might not even realize they're getting shot for a moment
or so, because they don't hear the gunfire.
The rate of fire of the Sten is pretty much the same
as the Thompson or MP40, even though most people seem to think it's less
(probably because of the quiet sound effect).
Personally, I think the Sten would be the undisputed
best gun in the game if it weren't for the fact that it overheats. The insane
accuracy and nice clip size is extremely useful.
FG42

Bodyshot: 15 HP (30 HP in sniper mode)
Headshot with helmet: 40 HP (48 HP in sniper mode)
Headshot without helmet: 50 HP (60 HP in sniper mode)
Reload time: 2 seconds
9 rounds per second
20 rounds per clip
Also known as the assault rifle, multi-gun,
paratroop rifle, or "Spray and pray" weapon, the FG42 is basically like an SMG
with sniping capabilities. At close range it is extremely deadly because of the
high rate of fire. Unfortunately it's also very inaccurate (high spread), so at
medium range you'll have to control your fire very carefully. At this range, you
can't go in firing recklessly because if you fire in one long burst, you'll
waste your whole clip in slightly over 2 seconds and then get caught on
reloading.
If you're mainly going to be sniping and doing very
little else, I would stick with a K43 or Garand. They do way more damage in
sniper mode than the FG42 so you can often take out a guy with one headshot.
They are also silent, and the scope can be zoomed in.
Sniping can still come in pretty handy if you are
using the FG42. It works great at medium range. For example, on Radar, sometimes
when I'm allies, I come through the side entrance, past the east parts, and
climb up the ladder into the room above the axis spawn. From there, I can spot
landmines around the parts, and snipe enemies who are guarding the parts.
You can also use sniping to make quick "potshots" at
the enemy. What you do is basically go into sniper mode, get off 1 or 2 shots really
fast, then get out of sniper mode. This is a good option when you're close
enough to snipe them, but far enough that your accuracy will be crap. Here are a
couple of times you might consider doing a potshot:
- You see an enemy running at some distance and
they haven't noticed you yet. Give him a couple of quick shots to the head.
- If you're losing a fight from
medium range, duck behind a wall or a corner, and wait for the enemy to come
into view. As soon as he does, do a quick potshot. If you're lucky and the
enemy was low enough on health, you can kill him before he sees you.
K43/M1 Garand

Bodyshot: 34 HP (50 HP in sniper mode)
Headshot with helmet: 48 HP (80 HP in sniper mode)
Headshot without helmet: 68 HP (100 HP in sniper mode)
8 rounds per clip (M1 Garand) or 10 rounds per clip (K43)
If you're an engineer, rifle grenades are very
useful in a pinch, and give you engineering XP. Much like panzers, almost
everyone hates rifle nades because they're cheap as hell. At least it makes some
sense though- engies die pretty quick so at least they should have a decent
weapon to defend themselves with.
Many veteran FPS players are
very skilled with SMGs, so that may be a better choice for you- but I still
suggest learning how to use a rifle nade. At close range, try to bounce the
grenade at the enemy, and at far range you can use it like a mortar- it will go
high in the air and explode on impact. You can also learn a lot of cool bank
shots to hit enemies who are out of sight. It's a very difficult weapon to get used
to because the nades don't go where your cursor is, and there is some delay
between when you fire and when they impact. But, they're really worth learning,
so practice with them every time you play engy.
The rifle itself is pretty powerful as well, doing
approximately double as much damage per shot as an SMG. If your enemy has 100 hp
or less, 3 bodyshots will be enough to kill him. The rifle's accuracy is less
than that of an SMG, so it's mainly a close range weapon.
If you're a covert, this is a great weapon- it's
silenced, powerful, and great for sniping. If you can, try to wait for the "sway
bar" to be green before you fire.
One important thing to note. A lot of people don't like the M1 garand, for good
reasons: it has only 8 rounds per clip instead of 10, and you can only reload
once you finish a clip, which means if your clip is almost empty, you either
have to fire the extra shots into the air to get rid of them so you can reload,
or you have to risk reloading in the middle of a fight.
Note that on some versions of ET, the Garand and K43
are exactly the same (same clip size, and ability to reload any time). But this
is usually not the case.
MG42

Bodyshot: 20 HP
Headshot without helmet: 20 HP
Headshot with helmet: 20 HP
18 rounds per second
150 rounds per clip
450 clips total
The MG42 is an extremely powerful weapon, typically
used for defending choke points. Just set it up somewhere, put it on the bipod,
and fire at anyone coming through the area you're definding. The main weakness
is that when you have the bipod set up, your angles are very limited so you're
pretty vulnerable if someone manages to attack you from a wide angle. Panzers,
airstrikes, and rifle nades can also take you out very quickly. That's why you
need to try to defend narrow areas, and also have quick reactions so enemies
don't have a chance to kill you. The other main weakness is that you use up ammo
very quick, so try to request ammo well in advance.
Although this is typically a defense weapon, you can
use it as an offensive weapon in some situations. This can be devastatingly
effective if you use it cleverly. Also, you don't always have to use the MG with
the bipod while prone. Here are some unconventional uses of the MG:
- On Radar as Allies, set up an MG near the main gate and
mow down axis who are guarding the west radar parts. This helps to clear the
way for your teammates.
- On Battery, when you're trying to
get up the assault ramp, set up an MG and fire at any axis such as medics,
field ops who are trying to airstrike you, coverts sniping you, and coverts
satcheling the ramp. You have to set up your MG at a very specific place for
this to work though- check out the Battery Tactics section for more info.
- Run up to your enemy with a
pistol, then as soon as you get very close to them, suddenly whip out your MG,
crouch for accuracy, and spray them with bullets. Even though the MG is very
inaccurate, at super-close range, it is accurate enough that you can mow
people down very, very fast. One place you could use this is as Axis on
Goldrush- say an Ally has just stolen the gold and is on his way to the truck.
You can block his path, and mow him down at close range.
Note that crew-served MGs and tank MGs are also
formidable weapons. Crew-served MGs are often placed in strategic locations, and
are on high ground, so they can be very useful. When you use them, you will
notice the screen shaking like crazy but it's actually just a bug: in reality,
the fire goes where you are pointing. So, just keep aimed on the enemy, and
you'll kill him. Tank MGs are excellent for mowing down targets at medium range.
I love to hijack the tank if I'm playing axis: but this is something that you
need to communicate with your team. If you want to use the tank MG against the
allies, but the field ops on your team wants to airstrike it, you'll just end up
getting blown to pieces.
Flamethrower

200 "shots" (each "shot" is one burst of
flame)
No need to reload clips, never overheats
The flamethrower basically drains the player's health by 5 HP, at some rate.
There are two ways a person can receive damage from a flamethrower:
1) Flame damage: As long as someone stands
inside a flamed area, they will receive damage at a quick rate. The rate
increases if there are more "flames" in that area.
2) Burn damage: Once someone has been flamed,
they will receive an additional 30 hp of damage over approximately 2 seconds
So for example, if you flame someone, but then they
immediately jump away to safety, they will probably sustain 45 hp of damage from
the time they were in the flame itself, and then an additional 30 hp from burn
damage. That's why it's so hard to kill medics, who often have anywhere from 125
to 156 hp. Also, since burn damage occurs so gradually, they can often heal
themselves while they are burning.
The upshot is that if you want to be effective, you
need to be persistent and keep people inside your flame for long enough- don't
just spray a little piece of flame and then allow them to run away. It really
helps once you have heavy weapons lvl 3 because you can run faster while holding
a flamer.
Another strategy that can be effective is to burst
someone with some flame, then while they're somewhat blinded and losing HP,
finish them off with an SMG or pistol.
The toughest thing about flamethrowers is that you
have to be pretty close to your enemy to use them. So, don't charge at enemies
with a flamethrower- try to sneak up on them. Or, use corner whoring and clear
out small rooms/areas. Another problem is flamethrowers are pretty messy- try
not to kill teammates!
Panzerfaust

4 shots, very long recharge time
Instant death to anyone within a ten foot radius
Can be used to damage tank/truck
Firstly here's a picture for you to get some idea of
the range of a panzerfaust:
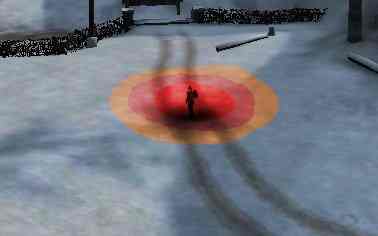
Can you see the axis medic standing there? So, say
you aim a panzer at the spot he's standing on. Then, the red area means your
target has no chance, they're definitely dead. The pink area means they will
probably die, unless they are a medic with high HP or an engineer with a flak
jacket. The orange area means you won't kill your enemy, but you'll still score
a hit, and deal some splash damage to them.
The key to using this weapon is to take out more than one guy at a time. If you
can't do this at all, you might as well just be using an SMG. However on the
other hand, it's OK to use your panzer for 1-man kills especially if you don't
have level 4 heavy weapons. Better you take that shot and kill the enemy than
try to hold your fire or use a pistol and then get killed by him. Maybe killing
that 1 guy will clear the way for you to move further near an enemy spawn or
gathering point so you can then get a nice big fat cluster of enemies.
There are a few places where a panzer can be
especially useful:
1) Near an objective: For example, if the
allies are trying to move the tank but the axis have taken control of that area,
use a panzer to clear the area a bit.
2) Spawnkilling: Just find some place where
you're relatively concealed or have a good height advantage, and then as soon as
the axis come tumbling out of their spawn, take out a clump of them. Obviously
don't stand directly in their spawn, because of the 3 second invulnerability.
3) Taking out an MG: Sometimes one MG can bog
your whole team down. A panzer is often a good solution. The key is that you
can't be slow about it, because the second an MG spots you, you will get mowed
down very fast. Try to know exactly where the MG is before you expose yourself-
either do this by leaning around a corner, or running out into the area where
the MG is and then quickly running back. Once you know where it is, get just out
of sight, start charging up your panzer, then leap out at the last second and
let the shot fly.
4) Killing a specific enemy: For example, on
Radar, if you're on Axis on Radar, and you see someone getting away with the
radar parts, what would you rather have- an MP40 or a Panzer?
You probably already know this, but don't aim at the
enemy. Aim for the ground they're standing on. So, try to know where all the
spots are to get on to higher ground. For example, on Railgun, there are some
spots where you can climb the steep hills and then stand up really high above
everything else. If you must shoot someone who is on the same level as you, jump
right before you shoot your panzer- even this small height increase can help.
Practice panzering at far range, as you will have to
lead your targets by quite a bit. (If they're running to the right, aim to the
right of them). Also practice close range shots. More specifically, practice
panzering at close range without killing yourself :) The key is to shoot
slightly behind your enemy! Most people shoot down at their feet and end up
getting vaporized.
Very useful trick: you can cancel a panzer shot by
leaning left or right (use the Q and E keys). Practice doing this often so that
when the time comes that you actually have to cancel a panzer shot, you don't
freak out and forget to do it, or you fumble hitting the key, etc.
Mortar

A very much underappreciated weapon, I think. If you
are good with a mortar you can make quite a lot of kills, as well as really piss
of your enemies, since most of the time, you never know when a mortar is
going to fall on your head and thus no way to avoid it :) It works best when
there are a lot of people playing, since that increases the chance you'll hit
enemies. However, in my ol' clan JAE, our mortar was awesome and could get
highest fragger even though teams were only 7v7.
The mortar is like the panzerfaust in that it does
heavy damage to a large area. However, the nice thing is that you don't have to
expose yourself to your enemies, and don't have to be on higher ground to be
effective. The goal of the mortar is basically to take out as many enemies as
possible- usually spawnkilling- so they don't bother your team. It can also be
very good for targeting objectives. For example, use it to disable the tank on
fueldump or goldrush. On Battery, mortar the assault ramp construction. Ive even
seen one guy set up a mortar outside the antitank gun on Oasis- then when the
engy on his team planted dyno and an enemy engy came to defuse it, he just
mortared the room. Very effective!
Use the command map to figure out where your mortars
are going. A little target symbol will appear at the point the mortar hit, so
you can use that to perfect your aim. Another useful way to adjust your
targeting is this rule of thumb: every decrease of 5 degrees in your angle
roughly corresponds to your mortar going 1 extra square on the map. Typical
angles I use are around 70-85 degrees.
You can also see where your enemies are by looking
at your command map. Any enemies that a covert ops on your team can see shows up
on your command map. Also, when a field ops calls an artillery strike, a symbol
appears in that area showing where the airstrike is. It can be pretty effective
to combine mortars with artillery strikes- that way it's extra likely that
nobody will get past that point. I've also seen two mortars working together to
very good effect. Both mortars target two points on a common walking route
(often the route out of spawn).
Some of the best mortars I've seen were amazing at
doing this. If you were on the other team and there was a covert ops nearby, you
could count your life in seconds, because that would put you on the mortar's
map. Obviously this takes a lot of skill because you have to be able to
precisely calculate which direction and angle to aim the mortar based on what
you see on the map. Targets may also be moving, which makes things even tougher.
Memorize the good mortar spots, and the angles you
need on each one of them. Also, get yourself a spawntimer. (I recommend Heron's
spawntimer- read more about it in the "Scripts & Tweaking" section.) When the
enemy spawns, you should mortar them, killing as many ppl as possible. The rest
of the time until the next spawn time, you should spawn other areas such as
objectives, areas where enemies have been spotted on your map, etc. If you are
very good at calculating where your mortars will land, you may even be able to
take out annoying MGs or even other mortars. This may require some communication
with your teammates.
When you run out of ammo, self-kill (use the /kill
command, see the "Scripts & Tweaking" section for more information). Don't ask a
field ops to be an ammo whore for you, and don't steal ammo from the cabinets,
because then you'll guzzle up all the ammo that other people need. The only
exception is if you have some low-level field ops on your team who really needs
the XP, then you can tell him to feel free to give you ammo.
You might notice that if you set up your
mortar on a steep hill, the angles that you can shoot on are modified. So,
unless you actually want to get an odd angle, set up your mortar on flat ground.
The weirdest exploit of this is that you can actually sit on top of the lamp in
the bank in goldrush, and set up your mortar at zero degrees and aim your bombs
in the doorway to the bank. (I don't recommend doing this, hehe).
Another very odd use of the mortar I've seen is on
Goldrush. What you do is set up your mortar right before the Axis spawns (at the
second spawnpoint, near the bank), and shoot straight up (90 degrees) right
after they spawn. Then just sit there. What usually happens is the enemy sees
you sitting there, and then everyone starts shooting, trying to kill you-
instead of running out of the spawn like they really should. So, by the time
they kill you, their invulnerability has worn off, and the mortar you shot into
the air finally comes down and takes out several Axis at once. If your enemies
don't know about this "trick", this can be very effective.
Grenade

Depending on your class, you get anywhere from 1 to 8
grenades each life. Make sure to use them! That's a whole lot of really
good firepower up your sleeve, and most people use them only occasionally. One
way you can tell the difference between a good player and a great player is how
they use nades.
The main uses for a grenade are:
- Clearing out a hallway where intruders are
coming (listen for footsteps)
- Clearing
out an enclosed area, such as the bank room in GoldRush
-
Killing somebody who's chasing you without getting into a fight
-
Killing somebody without being seen by them
-
Suicide mission (run into a group of enemies while charging. They kill you.
Boom.)
- Damaging a tank (everyone
should help with this!)
- Defending an
important area or objective
- Disabling
an MG
- Gibbing an enemy
-
Clearing spotted landmines
Practice aiming your nades. Memorize how to throw
them at the right angles to go inside windows or doorways, etc. Get good at
chucking them a short distance or tossing them in a high arc.
Also practice timing how long you charge up your
nades. You can "prime" (charge up) a grenade by pressing and holding the left
mouse button. As soon as you want to throw it, let go. As you're holding it, the
grenade will make a "tick" sound. On the fifth tick it will explode. Here is a
quick guide to how you might choose to prime your nades:
- No priming, or 1 tick: Mostly if you
want to nade spam, e.g. throwing nades on your own dyno so engies can't defuse
it. If you have only 1 nade you're going to throw, you should prime it so it
has some chance of actually killing.
- 2 ticks: Useful for
lobbing nades with a high arc so that they explode roughly after they hit the
ground. For an even higher arc, you could jump as you toss the nade. You can
also create little "nade mines" in the ground so that they explode when
someone runs over it. For example, if someone is following me, maybe I'll
throw a nade on the ground after 2 ticks. They'll run over it thinking that I
didn't prime it so they still have 5 seconds til it blows up (BOOM!). The same trick can be used if you want to blow up a corpse.
Medics might come to revive thinking they have longer than they actually do
until the nade blows up. You can also toss a 2-tick nade at a high arc if you
want it to explode slightly after, the key is to jump as you are tossing it so
it gains extra height.
- 3 ticks: This kind of nade
can either be used at a short range (explode slightly after impact) or you can
toss it up at a medium arc to have it explode on impact. This is probably the
most common kind of nade I use personally.
- 4 ticks: Basically a short
range rifle nade :) It will explode more or less on impact at a short range.
You can't really make this go very far though because if you try to lob it, it
will explode in the air.
When you are going into a room where enemies may be
hiding, it's often useful to use the "spray and pray" technique. Here's how you
do it:
1) Check your command map to
see if any of your teammates are there
2) If no teammates are there, then charge up a grenade, and throw it in.
3) Now, the area is more or less safe to walk through. Hopefully there
was someone there and you killed him, or at least caused some damage.
This technique is great on oasis for example. If you
are an engineer going into the gun room to plant dynamite, don't just run in.
First, throw a grenade into the room, wait for it to blow up, and then run in.
That way, if anyone was in there guarding it, he'll be dead now.
NOTE: a lot of this applies to rifle nades as well!